Monday, December 31, 2012

Angry Bird Koozie

Angry Bird Koozie- Crochet What to do with all the left over red yarn I have from crocheting the Santa wine bottle covers?? Oh!  I know! Angry bird koozie!

So here's what you need:
a crochet hook, I used G
Some ready yarn
Orange, black and white felt
A needle and thread to affix the felt
A can of pop or cup for measurements

I started with the magic circle and double crocheted until my ring was the size of a pop can bottom. Then double crochet one row in the opposite loop so the koozie begins to turn upward. Continue to double crochet until you reach the top of your can. To make the feathers at the top of his head: on the last row, chain 5 and single crochet back continue on. I made 3 feathers, but I think he only has two. Oh well! Once you have the koozie crocheted, cut out your shapes for the face from the felt. I used sticky backed felt , but it doesn't stick so well so you will need to stitch it on. I'm not that artistic so my angry bird face isn't the best, but I still think it turned out ok.

Angry Bird Koozie- Crochet
Supplies you need
Angry Bird Koozie- Crochet
Cut out your shapes for the face


Etched Glass

I have been etching everything glass! Wine glasses we by far my favorite. I got a box of 12 from Walmart for $8 which is cheaper than $1 a wine glass at the dollar store. But those work too. I was just buying in bulk for Christmas gifts.

I also bought a large mason jar from Walmart and etched it with a mustache and the words my stache. This was for my brothers gingerbread cookies I make him every year. And he doesn't share too well! ;) I hand cut the mustache from contact paper and used my cousins cricut to make the words.

DIY candle holders. Plain glass from the dollar store can be etched into things of beauty! Fill them with DIY candles or store bought ones. Of course I didn't take pictures of the etched ones I filled with my DIY candles.

So go forth and get your glass items, go buy yourself some armour etch and some Plaid peel and stick reusable stencils then read this post about etching! It's super easy and makes some super cute gifts! 


Saturday, December 29, 2012

Glass block holiday decor

Glass Block Holiday DecorGo to Hobby Lobby or Michael or even Home Depot and grab yourself a glass block and get your imagination out. These glass blocks already have hole cut in them with a plastic plug. Some are rectangular holes and some are round so pick the one that works best for your project.

 Lets start with the Jingle block.  I have a cousin with a vinyl cutter and she cut the "jingle all the way" out for me.  You could buy a phrase like this or cut your own if you have a cricut.   I already has some silver bells, but need some more.  I used assorted sizes found in a tube at Hobby Lobby for $1.99. Now here's the hard part for me.... putting the ribbon on and tying a bow.  I can't tie bows to save my life.  But my wonderful cousin was there and she tied them for me!


Glass Block Holiday DecorFor the let it snow block I used my go to peel and stick reusable stencils and painted on the "let is snow" with glass paint.  The snow is made from kosher salt.  Hobby Lobby sells little bags of Christmas goodies to fill ornaments or use as confetti and that's where the snowflakes came from.  Had to use tweezers to get them in there and wiggled them a little into the salt. 


These are so simple and quick to make.  You can even back them with cute Christmas paper modge podge or spray glue. Fill with lights.  Use 3 fill with salt, and paint it up like a snow man.  Let your imagination run wild. 

Up next in the glass block department is to insert a photo in a frame and fill with rocks, sand? Not sure, but I will post on it when I make it. 


Wednesday, December 26, 2012

A DIY Christmas


 Now that Christmas is over, I can post all the things I made and handed out as gifts.  The coasters seemed to go over well as did the salt dough ornament tags.  I think my favorite was the Santa wine bottle covers and etched wine glasses.  I hope everyone liked their DIY gifts!

Most of all I had a really good time getting together with family for the pinterest parties and creating most of these crafts.   It was fun bonding, cooking, eating, crafting and trying new things.  I think I am in need of another pinterest party soon! 

Check out all the things we made

Soy Candles
Coasters
Wine Bottle Covers
Etched wine glasses
Corn Pads with drawstring case
Modpodge holiday decor
Glass Block holiday decor
Salt dough ornaments
Sharpie and dollar store dishes
Stay put dish towels
Crochet hook case


Sunday, December 23, 2012

West side crackers

Westside CrackersMost addictive crackers ever! My aunt has made these for years and I love them. So quick and easy and a big hit with everyone!  I've been seeing a similar recipe floating around on Pinterest, but here's ours.

2- 12oz Pkg Oyster Crackers
1 Cup Oil (canola oil is best)
1 Pkg Hidden Valley Ranch Dressing
1 1/2 TBS Dill Weed
1 TSP Lemon Pepper
Pinch of Garlic or Onion Salt

Mix all together and pour over crackers. Bake for 30 min or longer @ 250


Saturday, December 15, 2012

Stamped Coasters.

DIY STAMPED COASTERSI used the instructions from The Huckaby's Happily Ever After. Please be sure you use the StazOn ink otherwise it will not dry and smear and you end up trying to figure out how to salvage your coasters like I did. Since I was trying to be cheap and just used the ink I had on hand I ended up covering my coasters in polyurethane to seal them. :-/ Then I switched to the correct ink and made a ton!

So now off you go to buy these items:
Tumbled marble tiles from lowes or Home Depot. Less than $4 for a box of 9
Minwax finishing paste $10
StazOn ink. $7 Use coupons to save money
Felt or rubber pads for the bottom of the tiles
Stamps of your choice

I made a bunch of these for Christmas so it ended up justifying the cost of the finishing paste as I couldn't find a small container anywhere. They are so easy to do with the stamps I had on hand. Just stamp a letter in the corner and a cute design on the rest of the tile. Then coat with a thin layer of the finishing paste. I completely covered the underside of the tile with sticky backed felt. Tied up with garden twin and homemade salt dough ornaments. These were a big hit for Christmas!


DIY STAMPED COASTERS


Saturday, December 8, 2012

Sharpie and Dollar store dishes

Sharpies on Dollar Store Dishes Sharpies on Dollar Store Dishes Sharpies on Dollar Store Dishes

Hit the dollar store for some cheap plates, mugs, bowls, etc.  Grab a sharpie.  Yes, a Sharpie.  Use that Sharpie to design your own dishes.  Let your imagination run wild.  Use stencils as I did with the Tea Please mug above, or free hand it like I did with the Paul love's 48 plate.  (note Paul doesn't really love 48, but he gets so upset when we tease him about it)   Once you are done designing, put them in a cold oven.  Bake at 300 degrees for 30 minutes.  Turn the oven off, but leave your dishes in the oven to cool down to room temp.

Now I know there are pinners out there saying this doesn't work and you need special markers made for ceramic.  Well you DON'T!  This works fines.  Just be aware that if you use colors some of them will fade when baked, and some will even wash off if you run them through the dishwasher.  The black, blue and red sharpie did not fade, or wash off in the dishwasher.  Yellow baked to a brown and maintained the brown color through the dishwasher.  We used some greens, teals, shades of pink, orange... and they faded or washed off in the dishwasher.  So I'd stick with black, blue or red otherwise go ahead and buy the ceramic pens! 

Saturday, December 1, 2012

Salt Dough

Salt Dough gift tags or ornaments
Decorate Christmas Gifts
Salt Dough gift tags or ornaments
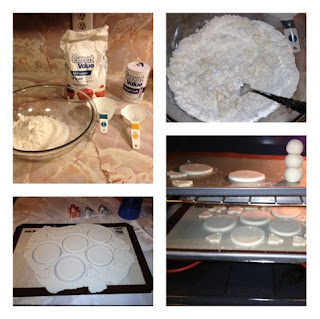
Things you need
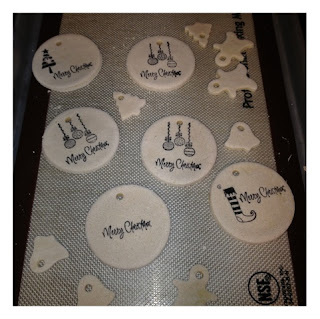
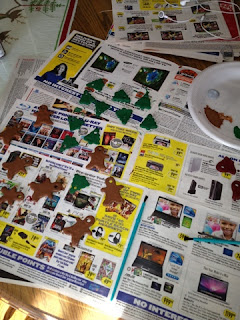
Salt dough recipe: 1/2 cup salt, 1/2 cup warm water, 1 cup flour stir until dough forms. Roll out the dough to about 1/4 inch thick and cut the shapes with cookie cutters or a cup. I used a straw to poke the holes so that I could tie them up with string.  Now you can bake for approx 2 hours at 250 degrees until hard or you can let air dry.  I am a very impatient person and have a hard time waiting for things.  But i did it both ways.  I found that the baked ones dried flatter and were a little bit darker but way easier to stamp or paint.  The air dried ones were almost pure white but the edges kind of curled up and they were very uneven for stamping.  The acrylic paints took several coats to cover these. Once these were baked I went to town using my clear stamps and StazOn ink  to decorate the round ones up for Christmas gift tags. I just used a red sharpie on the back to write to and from.  I enlisted my husband to help me paint all the little shapes to add to bags and presents.  This would be a fun easy craft for the kiddos.  You could even make the hand print or foot print ornaments with the kids.  The possibilities are endless.  

Salt Dough gift tags or ornaments
Stamped with Christmas Stamps for Gift Tags
Salt Dough gift tags or ornaments
Paint them with acrylic paints